

Gutter installation is the process of fitting roofline channels and downspouts that collect and divert rainwater away from a building’s walls and foundation, protecting a home from water damage and erosion. This guide explains the gutter installation process in clear, actionable terms, showing how correct planning, material choice, slope, and fixing techniques combine to create a reliable rainwater management system. You will learn how to measure roofline runs, select suitable materials for Adelaide conditions, arrange hangers and downspouts, and complete watertight joins while avoiding common pitfalls. Practical troubleshooting and maintenance advice follows so you can prevent leaks, blockages, and sagging over time. Finally, it outlines when to attempt a DIY installation and when to engage professional services, including local Adelaide cost context and the advantages specialists deliver.
Essential Planning and Measurement Steps for Gutter Installation
Effective gutter installation starts with measured planning: quantifying entire gutter run length, identifying downspout positions, and calculating slope (fall) to ensure water flows to outlets. Accurate measurement reduces waste, ensures correct hanger placement, and determines material needs, which together cut cost and prevent rework. The following steps summarise the planning stage and prepare for the tools, materials, and the installation sequence described later. Proper planning also highlights potential complications such as roofline obstacles, fascia condition, or multiple-storey access, which can change the risk and method involved. The next subsections detail how to measure roofline runs precisely and how to set the correct slope for reliable drainage.
How to Accurately Measure Your Roofline for Gutters
Measuring a roofline begins by recording each eave run from corner to corner and summing those lengths to produce total gutter linear metres; include projections for valleys, porches, and return sections. A tape measure or laser measure is used from ladder safe points, accounting for corners by measuring along the eave line rather than straight line diagonals, and adding 50 to 100mm per join for overlaps. Potential downspout positions are counted, typically one per 8 to 12 metres of gutter run depending on roof pitch and rainfall, and marked on a plan to order the correct number of outlets and elbows. Accurate totals allow for ordering seamless or sectional lengths, calculating hanger count at standard spacing, and estimating materials before moving to the tools and materials stage.
What Is the Proper Gutter Slope and Why Does It Matter?
Gutter slope, or fall, is the small downward angle that moves water toward downspouts; without it, water pools and accelerates corrosion, leaks, and overflow. Industry practise sets a gentle fall across each run so water moves steadily. A few millimetres of drop per metre (a practical guide is 2 to 5 mm per metre depending on run length) is aimed for to balance flow and appearance. Slope is checked by establishing high and low points at the fascia during layout, then hangers and brackets are set to maintain that fall across the run; a chalk line or laser level simplifies verification. Ensuring correct fall prevents sagging after debris builds up and makes downstream drainage predictable, which is essential before cutting and fixing the gutter lengths in place.
Which Tools and Materials Are Needed for a Successful Gutter Installation?

A successful gutter installation relies on the right materials and tools plus safety equipment to complete the work efficiently and durably. Material choice should match local conditions. Resistance to corrosion, finish options, and thermal movement all matter in Adelaide’s climate, while tools vary by system type (sectional versus seamless). Below is a concise checklist of what is typically needed, followed by a materials comparison table to help you choose the best option for your home. With tools and materials selected, planning hanger layout, seam work, and downspout connections can proceed as covered in the installation steps.
The essential tools for most installations include ladders, chalk lines, tape measures, drill driver, tin snips, pop rivet gun, silicone sealant, and safety gear such as gloves and eyewear. For seamless gutter installs, a seamer and bending tools are also needed, while sectional systems demand accurate cutting and crimping tools. Renting specialist equipment for one-off seamless runs is often more cost-effective than purchase. Experienced installers often bring seaming machines and rivet tools that speed installation and improve longevity.
The next table compares common gutter materials for Adelaide homes so you can match performance to your budget.
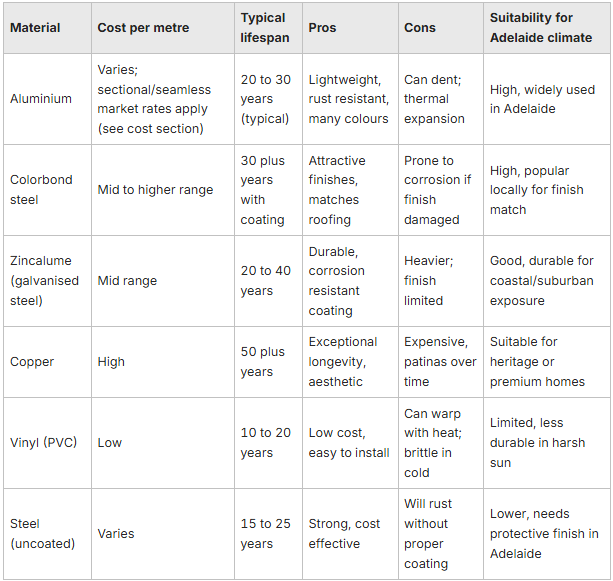
What Are the Recommended Gutter Types and Materials for Adelaide Homes?
For Adelaide homes, common gutter forms recommended include K profile (decorative profile), half round, and box gutters; selection depends on the roofline, heritage requirements, and stormwater load. Aluminium and Colorbond/Zincalume are often recommended for their balance of durability, finish options, and cost, while copper remains a premium choice for longevity and appearance. Seamless gutters are considered where possible to reduce leak points; seamless systems require on-site seaming tools but deliver fewer joints and a cleaner look. Local factors, such as heat, occasional heavy storms, and leaf loads from street trees, make corrosion resistance and guard compatibility important selection criteria before moving to installation.
What Essential Tools Should You Have for DIY or Professional Gutter Installation?
Preparing the right toolset reduces time on ladders and improves seal quality: a sturdy ladder with stabiliser, chalk line for slope, tape measure, battery drill, tin snips, and a pop rivet gun are core items for sectional systems. Safety gear (gloves, eye protection, harness on multiple-storey jobs) is non-negotiable, and a seamer or roll former is required for seamless installations which usually demand professional equipment. Add silicone or polymer sealant rated for outdoor use and rivets/fasteners specified for the material to prevent premature leaks. Having the right tools avoids makeshift fixes and speeds installation, which keeps scope and cost predictable as you transition to the step-by-step fixing sequence.
What Are the Step-by-Step Procedures to Install Gutters Correctly?
A correct installation sequence reduces callbacks and ensures drainage performance: it involves planning and measuring, preparing fascia/hangers, setting slope, cutting and joining gutter lengths, sealing seams, and finishing with downspouts and discharge arrangements. Each phase has important checks, including fascia integrity, hanger spacing, and fall verification, that prevent common failures like sagging or leaking at joints.
The list below summarises core installation steps for a typical single-storey run and introduces the mechanical actions that follow in the H3 subsections. Accurate execution of these steps sets the foundation for reliable long-term performance.
- Inspect fascia and roofline for sound fixings and rot; replace or reinforce where necessary before fitting hangers.
- Mark out hanger centres (commonly 600 mm) and downspout positions, set fall using a chalk line or laser, then fix hangers/brackets accordingly.
- Cut gutters to length, join securely with rivets and sealant, fit end caps, and attach to hangers maintaining the planned slope.
- Install downspouts and elbows to direct water away from foundations and connect to stormwater systems as required.
These core steps guide a typical installation from planning to finish; the next H3s unpack hanger attachment, joining/sealing, and downspout fitment in practical detail.
How to Prepare and Attach Gutter Hangers and Fascia Brackets?
Hanger layout begins by marking positions at standard centres, 600 mm is common, reducing centres to 300 to 450 mm at corners and openings for extra support. For timber fascia, pre-drilling and using corrosion-resistant screws or rivets into fascia timbers is recommended; for metal fascia or rafter tail fixing, select brackets designed for that substrate and ensure penetration to a structural element when possible. Attach the first and last hanger, then pull a chalk line to set fall across the run; progressively secure hangers while checking levels so the slope remains consistent. Properly set hangers prevent sagging, and verifying every fifth hanger during installation reduces the need for later adjustments and supports seamless joins.
What Is the Process for Cutting, Joining, and Sealing Gutters?
Cutting and joining must prioritise smooth ends and strong mechanical fastenings: measure twice, cut with tin snips or power shears, then deburr edges to prevent leaks and injury. Join sections with pop rivets and apply a high-quality external sealant (neutral cure silicone or polyurethane) inside seams and at end caps; allow recommended cure times before water testing. For seamless gutters, on-site seaming produces continuous lengths that reduce joint failures but require specialist seamer and crimping tools operated by experienced installers. Proper sealing and mechanical fastening together form a watertight system, so test by running water from the highest point to check for pooling or seepage before completing downspout connections.
How Should Downspouts and Elbows Be Installed for Optimal Water Flow?
Downspout installation positions outlets at planned points where they can carry roof discharge safely away from foundations; size and quantity depend on the roof catchment and local rainfall patterns. Common practise uses downspout diameters that match gutter outlet capacity. Install elbows to navigate obstructions and direct flow toward splash blocks or stormwater connections, and secure downspouts to the wall with straps every 1 to 1.5 metres. Where possible, direct discharge to stormwater systems or soakaways designed for the property; in limited access sites, use offset elbows and extensions to carry water beyond the building envelope. Properly sized and positioned downspouts complete the drainage chain and reduce erosion and foundation risk.
After outlining installation mechanics, you may prefer to have professionals execute these complex steps, especially for seamless gutters or multiple-storey work, so the next section briefly notes where local professional help can be appropriate.
Adelaide Roofing & Construction offers professional execution of the full step-by-step process for those who prefer not to DIY, bringing specialist tools for seamless systems and experience handling complex rooflines. Choosing professional help from Adelaide Roofing & Construction provides access to seaming machines, secure high-readiness fixings, and ensures compliance with local installation practices; for many owners, this reduces the risk of leaks and the need for early replacement. If you prefer to compare DIY and professional options, the section on choosing professional services below provides local cost context and decision criteria.
Troubleshooting Common Gutter Installation Challenges
Troubleshooting focuses on identifying root causes such as sagging, leaks at joins, or poor slope, and then applying targeted fixes like reinforcing hangers, resealing joints, or re-establishing fall. Many common faults are visible during a controlled water test: pooling indicates wrong slope or blocked flow, while leaks at seams suggest inadequate sealant or failing rivets. Preventive measures such as correct hanger spacing, proper end cap sealing, and installing guards where leaf loads are heavy avoid repeat interventions. The following H3s list typical problems with fixes and explain how Adelaide’s climate influences installation choices and maintenance cadence.
What Are Typical Installation Problems and How Do We Fix Them?
Common installation problems include sagging (often due to inadequate hanger spacing or fascia rot), leaks at seams or end caps, and blockages in downspouts. Sagging can be fixed by reinforcing existing hangers or adding new brackets at closer centres and by repairing or replacing rotten fascia timbers; leaks can be resolved by removing failed sealant, cleaning joint surfaces, and applying fresh external grade sealant with new rivets. Blockages can be cleared using a downspout snake or water jet, and installing guards should be considered if debris recurs frequently. For structural or multiple-storey issues, professional assessment for safe access and fascia replacement is recommended rather than attempting high-risk DIY work.
Adelaide’s seasonal conditions, including hot summers and episodic heavy storms, affect material choice, sealing, and guard selection, so methods should be adapted accordingly.
Where advanced problems arise, such as fascia replacement, complex drainage runs, or inspecting storm damage, professional-grade tools and skills deliver reliable outcomes that DIY methods often struggle to match.
Adelaide Roofing & Construction can assist with advanced troubleshooting and remedial work using professional tools and techniques, providing solutions for fascia repair, complex downpipe re-routing, and durable resealing. When structural repairs or elevated access are required, engaging skilled professionals ensures safety and a long-term fix rather than repeated patch repairs.
What Are the Best Practises for Post-Installation Care and Maintenance?
Post-installation care preserves function and extends gutter life: it involves scheduling inspections, maintaining clear downspouts, resealing joints when necessary, and fitting guards appropriate to debris type. Regular maintenance prevents small issues from becoming structural problems. Early detection of sagging, rust, or cracked sealant avoids costly replacement. Below are practical inspection schedules and repair techniques including guard options, followed by an explanation of how often to clean and what repair steps typically achieve durable results. Consistent maintenance strategy also informs whether more robust materials or professional servicing are cost-effective over time.
How Often Should You Inspect and Clean Your Gutters?
It is recommended to inspect gutters at least twice yearly, in autumn and spring, and after major storms to remove leaf litter, check for sagging, and verify downspout flow. Properties with heavy tree cover may need quarterly checks. During inspections, look for pooling, split seams, detaching hangers, and signs of corrosion at joints; clear debris using a scoop and water test to confirm free flow to outlets and downspouts. If repeated blockages or overflow are noticed, consider adding guards or increasing downspout capacity and schedule a professional inspection for hidden fascia damage. A proactive inspection routine catches problems early, which reduces repair scope and cost over time.
What Are Effective Gutter Repair and Guard Installation Techniques?
Common defects, leaky seams, detached hangers, and damaged end caps can be repaired by replacing rivets, cleaning and reapplying exterior-grade sealant, and reinforcing hangers into sound substrate; ensure repairs use compatible materials to avoid galvanic corrosion. Gutter guards come in mesh, foam, and reverse curve styles; choose mesh or micro-mesh for fine debris like flower petals, and reverse curve for larger leaf control, while balancing maintenance complexity and cost. Proper guard installation includes sealing around outlets and checking that guards do not trap moisture against the roofline, which can accelerate rot; when in doubt, professional fitting reduces risk of guard-induced problems. Correct repair and guard choices reduce cleaning frequency and preserve gutter performance.
Maintenance best practices lead naturally to the final decision: DIY or professional installation and how costs compare in Adelaide.
When Should You Choose Professional Gutter Installation Services Over DIY?
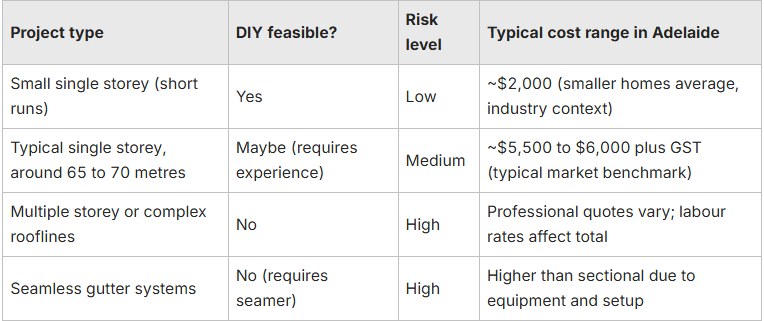
Deciding between DIY and professional gutter installation depends on project complexity, height and roof access, seamless gutter requirements, local safety and warranty considerations. Simple single-storey, short-run sectional installs may be DIY feasible for an experienced homeowner, while multiple-storey work, seamless systems, or extensive fascia repairs generally favour engaging professionals. The table below helps you decide by mapping project types to DIY feasibility, risk, and typical Adelaide cost ranges sourced from local industry context. After the table, the H3s explain the benefits of hiring Adelaide Roofing & Construction and provide a cost comparison that includes available local benchmarks.
Use the quick decision table to determine whether to DIY or hire professionals based on risk and typical cost.
What Are the Benefits of Hiring Adelaide Roofing & Construction for Gutter Installation?
Hiring Adelaide Roofing & Construction brings access to professional-grade equipment and installers experienced with local materials like Colorbond and Zincalume, improving seam quality and finish durability. They reduce leak risk by ensuring accurate fall, correct hanger spacing, and watertight joins, and can identify and repair concealed fascia damage before it undermines the gutter system. Using their experienced installers typically shortens project time, lowers long-term maintenance, and may include workmanship assurances; these benefits are particularly relevant for seamless systems, multiple-storey access, and storm-prone properties. Comparing these advantages against DIY effort helps you decide based on risk tolerance and desired longevity.
How Do Installation Costs Compare Between DIY and Professional Services in Adelaide?
A cost comparison should include materials, time, and risk: DIY saves on labour but requires purchasing or renting tools and assumes greater risk of mistakes and no workmanship guarantee. Industry context indicates typical Adelaide gutter replacement for a standard single-storey home (65 to 70 lineal metres) is around $5,500 to $6,000 plus GST, equating to roughly $90 per lineal metre in that market sample, while smaller homes or partial repairs can average around $2,000. Labour rates reported in local analyses approximate $55 per hour, which helps estimate the professional portion of quotes; factor in specialist tool hire for seamless systems when comparing. In many cases, higher upfront professional costs can save money long-term through fewer leaks, better finishes, and reduced maintenance.
The decision table above and the local cost context support an informed choice; if elevated work is faced, seek professionals to reduce risk and secure durable outcomes.
Adelaide Roofing & Construction can provide professional assessments and quotes for gutter installation or replacement to help compare DIY and professional options within the Adelaide market context.